


In this article, we will be covering
- What version control is.
- Setting up your Gitbash
- Initializing your repository.
- Making your first commit in Git.
- Creating your branches in Git
- Reverting to a commit
What Version Control is
Git is a version control system that is used to track changes that are made to a file or project. It was made by Linus Trovalds (The creator of the Linux Operating System) Github is a cloud open-source collaboration platform that brings together the world's largest community of developers to discover, share and build better software, from open source projects to private teams and to individual projects. Everyone can upload their codes and track changes made in a project for future use.
Setting Up your Gitbash
First off, you'll need to download git bash from git-scm.com or gitforwindows.org (if you're running a windows pc)
For the purpose of this course, we'll be creating a new folder, which I'd named babysteps2git, which we'll be using throughout this article.
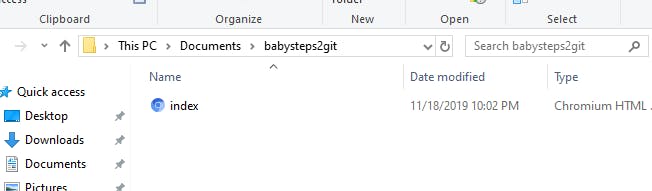
Inside this folder, we have a file, 'index.html' which we'll be using for instances, which I created from my favorite command line Interface - Cmder.
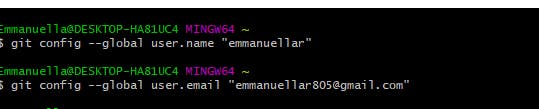
Now, let's set up our git globally by configuring or username and email, as this is considered your first time using git.
Open up your gitbash, Use the command $git config --global user.name "Your name" to configure your username and $git config --global user.email "Your email" to configure your email.
To check if your configuration has been added, type in
$git config --global user.name
to check your username and
$git config --global user.email
to check your email.

Initializing your Repository
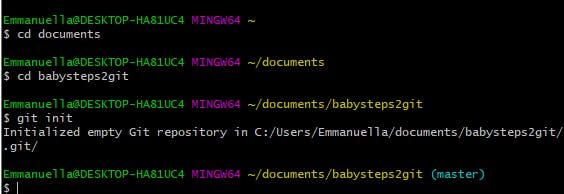
Just assume this to be the part where you tell git "Look this is the folder/directory where I want git to work in right now" To initialize a repository, we first navigate to the directory where our work is, in my case, the 'babysteps2git' folder.
Then we key in
$git init
Making Your First Commit in Git
Committing in Git can be viewed as saving when working on documents. It's a way of saving our changes to the repository and storing it with a unique ID and a message. The ID and message can be used to trace back to the version of the project if need be and that is one of the peculiarity of git commit as opposed to save as.
Before a commit can be made, you have to stage your work first. Staging is a way of telling the system say "Hey, I've made a whole lot of changes to my work, but this one, this one and that one are the ones I want to save"
Hence, when you want to add, you basically do this:
$git add name-of-files
If you want to add all the files you made changes to, do
$git add .
instead.
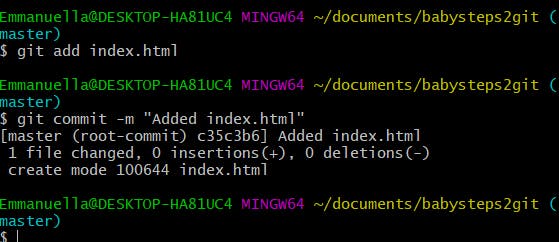
Now, after adding/staging the files, you can now commit them or to a lay man, what would look like a 'save'.
It is important to note that, it is very necessary to commit your changes using short but detailed commit messages like the one shown above.
To view the status of your repository, know which branch you're on, which files were modified, not staged, staged and is ready to be committed, use the code:
$git status
Creating Branches in Git
Let's say you're working on different versions of a project or you're collaborating on a project with some friends or colleagues, it is important to have a branch say "master", which is the default branch for every repository that stores the original and modified codes from the various contributors. To collaborate or work on various versions of a project, we have to work from different branches.
By developing in branches, it’s not only possible to work on multiple versions of your code in parallel, but it also keeps the main master branch free from questionable code.
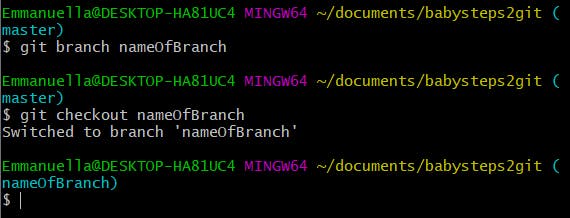
So, for our babysteps2git project, we can decide to have several branches, each housing a different version of the code. To create a new branch in git, we use the command,
$git branch nameOfBranch
To check out the new branch, use
$git checkout nameOfBranch
The above 2 commands can be done simultaneously using the command:
$git checkout -b nameOfBranch
Reverting to a Commit
Here comes another very interesting stuff about git, the ability to revert changes made overtime, something CTRL+Z cannot do.
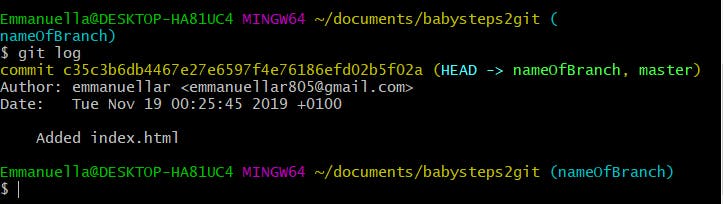
While working with git, you might want to go back to a particular state of your code, this can be achieved by reverting to the particular commit you want to get back to. Each commit we make, have a unique ID attached to it, to get this ID, you can type in
$git log
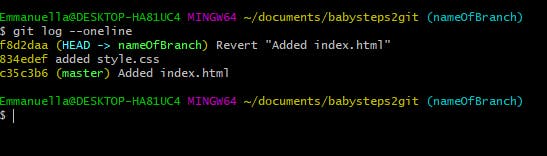
Alternatively, the output above can be logged in one line using
$git log --oneline

From the above, you can see the ID and commit messages for each of the commits.
To revert, key in
$git revert commit-ID
This command reverts to the very state of that code as at the time of that commit.
Several other git commands have been published on several other platforms including the git cheat sheets, but I hope this gets someone started today.
I'll be posting a sequel to this, but for now, do enjoy your baby steps. Cheers.