


Adding a table of contents in a blog post is a good way to let your readers know in a nut shell the content of your article and also avails them the opportunity to skip to a particular section of the article with just one click should they wish to do so.
For instance, you can decide to skip to the conclusion of this article, if you feel you already have an idea of what I'm writing about😎
In this article, I'll be showing you how to create a table of content for your articles which can be used to skip to certain sections of your post.
Step 1
So, the first thing to do is to preview your article, by clicking on the preview button right on top of your draft page.

Step 2
Select the heading you'd love to skip to, right click and select inspect (if you're on chrome). This will launch you to the developer tools.
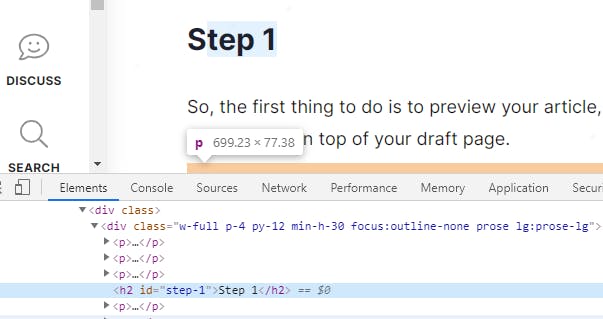
Step 3
In the image above, you'd see that the heading selected (Step 1) has a unique ID, copy this and save somewhere close.
Step 4
Go back to your table of content, select the list you'd love to link, click on the link tool right on top of your page and insert the id you just copied into the area that says (link)
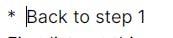
Let's do this vividly, to achieve the link below,
First list out this content
Then go ahead and select its texts, after which you click on the link icon right on top of your editing page.

Enter, the id you copied previously into the area were you have [link]. Append a # before pasting the id.
You'd have this

Repeat this process for every other content in your table. Preview. Your table of content is all set.
Conclusion
We just looked at how to add table of content in the articles you post on your hashnode powered blogs. I look forward to seeing you add them in your next article.
Enjoyed the article? Follow me on twitter